Your Ad Here

Nov 19, 2008

How To Solve Wireless (Wi-Fi) Connection Problems

Wi-Fi is awfully convenient, but it's also awfully buggy for many users, particularly those in areas crowded by competing wireless signals. If you're dealing with a loss of signal, try the following to troubleshoot your wireless setup.

1. Your PC might just need a little massaging. The best way to quickly disconnect and reconnect to your router is to right-click the wireless icon in the system tray and click Repair. If this doesn't solve the problem and you suspect it's still a PC issue, open a command prompt and type ipconfig /renew. This performs nearly the same operation as Repair but bypasses Windows, which could be causing the problem. If all else fails, reboot your PC.

2. If you're still having trouble, power-cycle your router by unplugging it, waiting 10 seconds, and plugging it back in. Your PC will need to reconnect after the router has booted up. Most routers lock up occasionally, and power cycling is the most reliable way to fix them. (Unless you can't physically reach your router, don't restart it through its management utility; that approach takes just as long, and the utility may not respond anyway.)

3. If you're still encountering frequent problems, you may be experiencing channel conflict, where multiple Wi-Fi routers are operating in the same narrow band of frequency. Download and run the evaluation version of WirelessMon; you can do all you need to with the demo. Look at the 'Channel Use' chart: Red and orange bars indicate channels under heavy use, while blue or no bars indicate relatively free channels. If your router is on a crowded channel, switch to a less busy one. You may see better performance and fewer dropouts.

Nov 9, 2008

How To Surf Anonymously

Not too long ago hiding your tracks on the Web usually meant finding an open proxy server to surf through or paying for proxy software like Anonymizer, which redirects traffic through its own proxy servers.

Today there's a better solution, and it's free: the Torpark browser. Torpark is a Firefox-based browser designed to access the Tor network of encrypted proxies. When you use the Torpark browser, your Web session bounces through multiple secure proxies, encrypted all the way, until your request reaches its destination. Torpark is a quick download and doesn't require a formal install on your PC; just launch the executable when you need it and make sure the Tor Network icon is active when the browser starts.

Secure browsing is considerably slower than regular browsing, though, so skip it If you don't need the extra security---and most people don't most of the time.

Oct 30, 2008

How To Diagnose Computer Problems Using Event IDs

Anytime your system crashes or an application freezes up, Event Viewer dutifully logs the error--but sorting through Event Viewer logs can be just as frustrating as dealing with the Blue Screen of Death. Here's a cheat sheet.

1. Start by familiarizing yourself with Event Viewer before you have a problem. It's under Start, Settings, Control Panel, Administrative Tools, Event Viewer. The utility's System node logs Windows issues (particularly networking ones), while the Application node logs issues with other software. You should not see much activity in the Security node since it is disabled by default and is used only if you have auditing turned on (which requires extra Microsoft software and ultimately doesn't help most folks anyway). Third-party apps might create more nodes, as well.

2. Events are fairly self-explanatory: The date and time of each event are logged along with its source, plus miscellaneous data about the issue. Most events will be noted as 'Information' and are generally safe to ignore. The 'Error' and 'Warning' entries are what you should concern yourself with. You can access the guts of the information by double-clicking the event to open its Event Properties page.

3. In the Event Properties window, you'll find detailed information about the error in question and a link to the Microsoft support Web site. Clicking the link will open a detail page within the Windows Help application (not your browser) for the error you're investigating. But often the information you get will tell you little about the problem, either saying no more data is available or declaring there's nothing you can do.

4. For more detail on the error types and what they mean, turn to the Web. Plug the event ID into EventID.net, or search for key phrases in the error message, and try looking for clues to your problem by using the 'Source' field in the Event Viewer log as a search term.

Oct 26, 2008

How To Safeguard Your Wireless (Wi-Fi) Network

Out of the box, most Wi-Fi routers are totally insecure. Fixing that takes only a few minutes, but you can easily get lost in the confusing menus of your router's management tool. Here's what to do.

1. If possible, plug in via ethernet to set up your router at the start--it'll save considerable time down the line. Don't bother installing the special software that comes with your router. Most routers can be controlled via a Web browser, which lets you manage your router from any networked PC.

2. To manage the router, type its IP address into your Web browser's address bar. If you don't know the IP address, go to Start, Run and type ipconfig /all in the field. The address will be shown as 'Default Gateway'. You'll also need the user name and password available in the manual or via an online search of the model number.

3. Once you can manage your router, change the administrator password you just looked up. This is typically under System Settings or a similar option.

4. Next, turn on encryption. WPA (or WPA-PSK) is about as secure as Wi-Fi gets today. Set a WPA key, and configure your clients to use the new key. (If one of the devices on your network does not support the WPA version you want to use, though, you'll have to go with a less secure method.) Look for 'Encryption' or 'Security' in the wireless management portion of the page (where you'll also find the following steps' settings).

5. It's a good idea to change the SSID from the default, which is usually 'linksys', 'belkin', or the like. Choose an SSID that doesn't invite inquiry from passersby (like 'broken' instead of 'janes-wifi' or '123mainstreet'). For extreme security, turn off SSID broadcasting.

6. Optional: Enable MAC address control, which limits access to computers you specify by their unique MAC address. This can enhance security, but MAC addresses are easily spoofed, and using this feature means you'll have to access your router's admin page to add new PCs to your network. To find a PC's MAC address, use the ipconfig command in step 2; look for the 'Physical Address'. Add that address to the allowed list in the appropriate router settings page.

Oct 20, 2008

Tweaking With PowerToys

Microsoft offers a sizable collection of useful yet unofficial and unsupported utilities called PowerToys. Following are the essential PowerToys for any serious computer user; all are downloadable from Microsoft's PowerToys for Windows XP page.

* ClearType Tuner: Dramatically improves font legibility on some LCD screens.
* Image Resizer: Adds a new menu when you right-click a photo on your PC. Just click Resize Pictures to change an image's dimensions without opening an editor.
* Tweak UI: If you don't already have Tweak UI, get it. This essential OS tweaking tool offers more granular control over your privacy settings and operations, and even over the way you log in to your PC (plus much more). It should be one of the first things you install on any new computer.
* Alt-Tab Replacement: Adds previews of each page when you switch between open applications using -.
* SyncToy: Improves the task of synchronizing files among multiple machines, especially compared with Windows Briefcase.

Oct 16, 2008

How To Restore the Run Command in Vista

If you use the default Start menu in Windows Vista (as opposed to the Classic Start menu), the Run command doesn't appear in it. To change that, right-click the Start button and choose Properties. With the Start Menu tab active, click the Customize button in the upper right. Scroll through the list of options and check Run command. Click OK twice. The command will now appear in the lower-right corner of the Start menu.

Oct 11, 2008

How To Troubleshoot Standby or Hibernate Problem

What if Windows doesn't awaken from its standby or hibernate modes?

Many standby and hibernate problems can be traced to graphics boards and sound cards. A simple driver update might get hibernation working again.

Some applications can cause sleep/wake-up difficulties as well. As a test, put your PC into standby or hibernation when particular programs are running, and when they aren't. If everything works when you're not running a certain program, look for a free update, replace the app if no such update is available, or close the program before you take a break.

A BIOS update could also resolve the matter. Check your system vendor's Web site to see if one is available.

If something doesn't work immediately after your system wakes up, wait a bit and try again. Your computer could take a while to come back. If all else fails, enter the name of the hardware or software you installed most recently along with the words 'standby' or 'hibernate' in a search engine to find Web pages and Usenet discussions on potential problems.

Oct 7, 2008

How To Find Out What Your PC Is Really Up To

The Windows Task Manager provides a good start when you try to discover what programs are running on your system, but it's only a first step. For more-detailed data, you need another tool. Your best bet: Sysinternals Process Explorer.

Get Process Explorer for Windows v10.21 at Microsoft TechNet. It needs no formal installation; just unzip it and run the .exe file. It will then list your PC's active processes, much as Task Manager does, but with better descriptions and organization.

Interpreting Process Explorer's information is fairly straightforward (and killing processes works much as it does in Task Manager), but here are some tips to help you make the most of the utility.

  • Consider adding the useful 'Handles' column to the view. Handles (a term that refers to programming methodology) are a convenient way to measure a process's resource utilization. Processes with high handle usage should be the first ones you kill when resources run low. Add the column by right-clicking in the header area and clicking the Select Columns option. Click the Process Performance tab and check the box next to Handle Count.
  • Note that Handles can also be created for media-based devices like CD-R drives, which may cause errors on eject. If you can't safely eject a disk or memory card, use the Find menu to search for the drive letter followed by a colon (for example, E:), and kill that process directly.
  • Instead of outright killing a process, you can suspend it (right-click on a process to see this option). This can be useful in the case of a runaway program stuck in an endless loop.
  • Want to know what a program's process identification is to better tell whether it's friend or foe? Open the program, then switch to Process Explorer. In the top-right corner is a target icon (concentric circles). Click this icon and drag it onto the program you want to ID; Process Explorer will highlight the process.

Sep 29, 2008

How To Safely Remove External Devices

The Hassle: I disconnected an external USB drive, but I can still see it in Windows Explorer. And every few seconds I get a 'Delayed Write Failed' error message. It's a pain in the neck--and confusing.

The Fix: The case of the phantom flash drive, eh? The Safely Remove Hardware tool (the green arrow in the system tray) is meant to complete any reads or writes and then flush disk buffers on the device. Not using it--and just disconnecting the device--is a game of high-tech Russian roulette that can result in corrupted files.

You probably know the safest way to disconnect such hardware: Click the green arrow icon, highlight the device, and click Stop.

If you're constantly swapping flash drives and other USB external add-ons, you might want some extra help. USB Safely Remove--a handy, $20 program--gives you more ways to handle multiple USB devices. For instance, the tool allows you to stop peripherals via keyboard shortcuts and lets advanced users employ command-line batch files to stop multiple gadgets.

Sep 18, 2008

List of Useful Boot Discs for Windows

Way back in the 20th century, Windows prepared you for the day your PC wouldn't boot. It came with a program that formatted a bootable floppy disk, complete with diagnostic and repair utilities. If you had the forethought to create that floppy while Windows was still working, you were ready when it eventually failed.

Alas, the Windows Boot Floppy went the way of DOS (the operating system it actually booted). Modern versions can't make that floppy (they can format a bootable DOS floppy--if you have the drive--but without utilities), and DOS can't handle NTFS hard-drive partitions.

Since Microsoft doesn't supply you with the ability to create an emergency boot disk, others have stepped in to fill the vacuum. Here are six worthwhile emergency boot CDs, all downloadable, and most of them free.

Yes, I know you can't download a CD. Most of these packages come as .iso files--easily burnable disc images. If you double-click an .iso file, there's a good chance that a program you already own--perhaps Nero Burning or Easy Media Creator--will come up and burn it to CD. If that doesn't happen, download and install ISO Recorder.

Know Your Rescue OSs

Since DOS doesn't handle XP or Vista repairs well, each of these discs boots into one of the following three operating systems. It's good to know a little about them.

Windows PE: The official, CD-bootable version of Windows (the PE stands for Preinstallation Environment) makes the obvious choice for this sort of thing. Unfortunately, Microsoft maintains strict control, and few utility authors have received permission to use it.

BartPE: Since Microsoft won't share its preinstallation environment, Bart Lagerweij created his own, and he gives it away for free. But to avoid copyright infringement, he can't give you everything you need to create a BartPE disc. The missing elements consist of Windows XP installation files you may or may not already have.

Linux Live CD: The name refers to any version of Linux you can download as an .iso file and boot off a CD. But Linux can be an intimidating environment for the uninitiated, it doesn't always handle NTFS well (many versions can read NTFS but not write to it), and it is seldom geared to help with Windows problems.

The Six Great Rescue Discs

So let's get on with it. I'll start with discs that simply give you access to the files on your hard drive, and work my way up to the powerhouses that can diagnose and repair most boot problems.

Puppy Linux

If Windows won't boot, nothing gets you into your hard drive faster or more easily than Puppy Linux. Puppy isn't the most powerful version of Linux by a long shot, but it's great for accessing NTFS-formatted hard drives--especially if you're not comfortable with Linux's whole mount concept. Just open the Drives window and select a drive, and Puppy will mount it for you--in read/write mode, if possible.

If Puppy succeeds in mounting the drive with read/write permissions, you not only can copy your files elsewhere, but you can also edit them. Puppy Linux comes with AbiWord, which supports .doc files, and Gnumeric, which supports .xls. And even if it mounts read-only, you can still copy the files to an external drive, most of which are formatted in the universally accessible FAT32 file system.

But be careful how you click. Actions that take double-clicks in Windows, such as opening a file, take only one in Puppy.

Price: Free

Download Puppy Linux.

BartPE

The BartPE operating system makes a pretty good boot disc on its own, getting you into Windows and letting you access your drive. It doesn't have much in the way of repair utilities, but it has chkdsk, which should probably be the first one you try. And it can run any portable Windows utility (that that doesn't require an installation) you care to give it.

Creating a BartPE disc isn't as easy as double-clicking an .iso file. You have to download, install, and run Bart's PE Builder. To create a CD, the program needs the Windows 2000 or XP installation files. One place you're sure to find them is an actual Windows installation CD-ROM. But the recovery disc that came with your PC probably doesn't have them.

Luckily, if your PC came with XP installed (and thus, not with a true XP CD), the necessary files are probably in a folder called C:\Windows\i386. But I do mean probably, not definitely. However, since the PE Builder is free, you're not losing much if it can't create a disc.

Although BartPE's program selection is slim, the PE Builder lets you add other programs to the disc before you burn it.

Price: Free

Download BartPE.

Vista Recovery Disc

It looked like Microsoft was finally going to do the right thing. Beta versions of Vista SP1 came with a modern equivalent of the old Windows Boot Floppy--a Start menu option called "Create a Recovery Disc" that burned a Windows PE-based emergency CD.

Alas, Microsoft removed that feature before SP1 shipped--but not, fortunately, before NeoSmart turned the disc into an .iso file and made it available on their site.

Running on the Vista version of Windows PE, the Recovery Disc is basically a Vista installation disc minus the install files. It even has an "Install now" button that asks for a Product Key before failing. You're better off clicking the Repair your computer button. Among its Vista-only options are a tool for diagnosing and fixing startup problems, a version of System Restore that uses restore points on the hard drive, the restore portions of Vista's backup program, and a memory diagnostic tool.

Price: Free

Download Vista Recovery Disc.

Ultimate Boot CD for Windows

This BartPE-based boot disc comes with a huge selection of tools to access your data and get your PC booting properly again. Some of them are even useful.

UBCD takes a long time to load and asks you some odd questions before it's finally up. But once it's there, you can edit the Windows Registry (yes, the one on the hard drive) in RegEdit, recover deleted files, and even run benchmarks. There are several malware scanners, four defraggers, and eight diagnostic programs (including HD Tune and Windows' own chkdsk).

This boot CD also includes backup utilities to help you salvage your files. There's a driver backup and a system profile backup whose Web-based documentation no longer comes up. And four separate image backup programs. One of those programs, DriveImage XML, I considered recommending in past articles but didn't because restoring from it requires a second Windows installation--something the program gets with UBCD.

The experience of setting up UBCD is identical to creating a BartPE disc--with the same possibility of failure. But when it works, you get a lot more.

Price: Free

Download Ultimate Boot CD for Windows.

Trinity Rescue Kit

This is the only Linux Live CD variant I've ever encountered that is intended specifically for rescuing Windows computers. As such, it's no surprise that it's a powerful and versatile repair environment.

But it's really not designed for Windows users. TRK's command line interface could humble anyone but the most devoted Linux geek.

If you take the time to read the 46-page documentation and learn the program, you'll be rewarded next time disaster strikes. Among the tools that will be at your disposal are a script that runs 4 different malware scanners, a tool for resetting passwords, a Registry editor, a program that clones an NTFS partition to another PC over a network, a mass undeleter that tries to recover every deleted file on the drive, several tools for recovering data off a formatted or dying disk, two tools for fixing master boot record repair programs, and hardware diagnostics.

Price: Free

Download Trinity Rescue Kit.

Active@ Boot Disk

Finally, we come to a boot disc that offers useful tools, is easy to use, and can be created from virtually any XP or Vista computer. The catch? At $80, it costs $80 more than the other five options put together.

Based on Windows PE, LSoft Technologies' Active@ Boot Disk offers a well-chosen collection of utilities, including image backup and recovery, a CD/DVD-based data backup program (Windows PE and Active@ load entirely into RAM, making the disc drive available for other uses), and a tool for recovering deleted partitions and files. You can change Windows passwords, wipe your hard drive, and choose between three partition managers. A Windows Explorer clone lets you copy files off of the hard drive.

You can even bring up Windows' Task Manager, although I'm not sure why you'd want to. And if you're feeling really geeky, there's even a HEX editor.

Price: $80 (ten-day free trial period)

Download Active@ Boot Disk.

Sep 13, 2008

3 Easy Fixes for Windows Annoyances

I'll repost an article from PC World website that may help users solve some windows annoyances. This article was originally written by Steve Bass of PC World.

-------------------------

Overhauling the stock utilities in Windows can make your system faster, smarter, and easier to use. But some downloads do more harm than good. Here's how to resurrect your picture viewer if a third-party one trashed it. Plus, I'll give you a one-click hibernation hack and two useful speed-boosting tips.

Picture Viewer Gone Missing

The Hassle: I installed a free image viewer, and it was awful. I uninstalled it, but now the viewer that came with XP has vanished. What can I do to get it back?

The Fix: You're talking about XP's Windows Picture and Fax Viewer, and it's handier--and more versatile--than most people think.

Back to your dilemma: You'll need to re-register the viewer. From the Start menu, choose Run, type regsvr32 %windir%\system32\shimgvw.dll, and click OK.

If that doesn't do it, open My Computer, select Tools, Folder Options, and choose the File Types tab. Depending on your programs, you may find a pretty long list. Scroll to a file association that you want to change, and select it. (Start with BMP, GIF, JPEG, and JPG; do each one individually.) Click the Change button, browse to Windows Picture and Fax Viewer, and click OK.

Who's Got the Hibernate Button?

The Hassle: When my buddy wants to turn off his PC, a Hibernate button appears next to Standby, Turn Off, and Restart in the Turn Off Computer screen. How did he do it? I want one!

The Fix: Ready to jump through hoops? First read Microsoft's article KB893056; afterward, request the XP hot fix, and then fiddle with the Registry (which you've backed up in advance, of course).

A quicker, cooler way is to stick a Hibernate icon on your desktop, avoiding the Start menu altogether. First, make sure that Hibernate is enabled: In Control Panel, click Power Options, choose the Hibernate tab, select Enable hibernate support, and click OK. Now from the desktop, right-click, choose New, Shortcut, type %windir%\system32\rundll32.exe PowrProf.dll, SetSuspendState in the 'Type the location of the item:' field, and click Next. Type Hibernate and click Finish. Finally, right-click your new Hibernate shortcut, select Properties from the drop-down menu, choose Change icon, and browse to my Hibernate icon (right-click the icon and choose Save As from the drop-down menu).

Better Performance--And Desktop Searching

The Hassle: Windows Vista's Indexer bogs down system performance as it constantly catalogs the contents of my hard drive.

The Fix: Indexing in Vista is almost as worthless as it was in XP. It takes a big gulp of resources and slows down your system. So I say disable it. From Add/Remove Programs, click Add/Remove Windows Components in the left panel, deselect Indexing services, and click Next.

Speed Up Your Apps With Actual Booster

I'm a sucker for any free utility that claims to speed up my system, so I risked hosing my PC and used Actual Booster for a month. Windows uses priority levels to determine how much CPU time an application gets (the default is 'normal'). Actual Booster automatically sets the priority level of the program you're using to full blast.

One thing to remember, though, is that when you're multitasking, setting the priority to 'high' on one application takes processor time from those in the background. Also, if you have a brand-new, super-duper, quad-core PC, Actual Booster might not do much good. Yet on slower computers, and especially my dog-tired old notebook, I can see a big difference. One drawback: On some PCs, Actual Booster causes the mouse to stumble.

Sep 10, 2008

How To Repair Winsock 2 Settings

What is Winsock?

In computing, the Windows Sockets API, which was later shortened to Winsock, is a technical specification that defines how Windows network software should access network services, especially TCP/IP. It defines a standard interface between a Windows TCP/IP client application (such as an FTP client or a Gopher client) and the underlying TCP/IP protocol stack.

Basically, when you have a problem with Winsock, the most common symptom is that you don't have internet access. ^^

My Solution

I use LSPFix. What is it? I'll take its description from the program author's website:

LSP-Fix is a free Windows utility to repair a loss of Internet access associated with certain types of software. This type of software, known as a Layered Service Provider or LSP, typically handles low-level Internet-related tasks, and data is passed through a chain of these programs on its way to and from the Internet. However, due to bugs in the LSP software or deletion of the software, this chain can get broken, causing the Internet connection to become inaccessible.

Unfortunately, problematic LSP software, including malware/spyware, is sometimes quietly installed by unrelated products such as file-sharing programs, sneaking onto a system unannounced. In fact, in many cases, the user does not know of its existence until something goes wrong, and he/she can no longer access Web sites. Historically, New.net* (NEWDOTNET) and WebHancer* (often bundled with file-sharing utilities, DVD player software, and other free downloads) have been the worst offenders, but the problem can be caused by any improperly-written Layered Service Provider software, or the deletion of any LSP program's files. LSP-Fix repairs the LSP chain by removing the entries left behind when LSP software is removed by hand (or when errors in the software itself break the LSP chain), and removing any gaps in the chain.

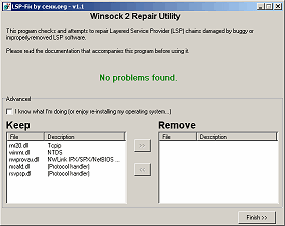
This program may be small but it is super useful. It saved me from re-installing the operating system altogether many times with my clients' computers. I recommend people who troubleshoot PCs for a living to put this handy tool in your arsenal. Here's a screenshot:

LSP-Fix Screenshot
This may sound like a sponsored advertisement, let me assure you it isn't. Lol.

Sep 7, 2008

Understanding Google

Meet Google, the "coolest kid" on the cyberblock!

Google is popular, and popularity means it may be tough to get in initially. Even if you do everything right, it could take months to see results, at least if you use their URL submission page. However, there is hope! There's a method to get indexed in 24 hours, so don't even bother submitting through the URL page.

But before you get to that, you should know about the guidelines you must follow to ensure that your site not only gets listed, but also doesn't get banned. Plus, you should learn about elements of your website that Google won't look at.

How to Get Google to Read Your Keywords First

Google's bots read web pages from the topmost left corner of your site to the bottom right. However, most sites are designed with all of the links on the left side, and the content on the right. Yet the problem with this design is instead of seeing your content first, Google sees the links first. Your links may not be seen to be as optimized as your content.

One solution is to use three panes rather than two. Keep the normal left and right panes, but add an extra pane at the top left of the layout. Don't put keywords in this extra pane. With this area "blank" when the Google bots read the site, rather than going for the links as they normally would, the bots see that a portion of where the links are is "blank." This then forces it to read the content first, which is more keyword-rich than the links.

Note that not all search engines read sites this way, which is why this guideline was dedicated to optimizing for Google. You could be on the safe side and use the layout anyway, especially if you do plan to submit to Google, which you should. It doesn't take away from the look of the site, and by using it you ensure that your content gets read first. If you don't use it, you aren't giving yourself the best opportunity to rank highly in Google search engine listings. Making tables isn't very hard to do. Most word processors and even WYSIWYG HTML editors provide them, so take advantage of it.

Things That Google Ignores

There are some HTML attributes that Google pays no attention to when it goes through its crawling process. While you won't get penalized if you use these attributes, why waste your time with them if they're not going to count anyway?

Of course, there are exceptions to these rules, as noted in the numbered list below. There are also some elements listed that you will choose not to include.

1. The keywords and description attributes of the meta tag. The keywords and description attributes are read by other search engines. However, the boost you get from having them isn't as much as if you follow the other techniques, such as proper link building. If you submit to Google only, you may not want to include the keywords attribute, but focus on a smart "upsell" or "positioning," "branding" of your message in the description attribute. Other search engines use them, so you should go on and include them.

2. The comments tag. The comments tag is an optional tag designed more for the website designer than for search engines or browsers. You use it to make personal notes related to what the upcoming coding does. It's especially useful if other webmasters are working on web pages that have been started by someone else. Still, it isn't a necessary tag, so you can omit it if you want.

3. The style tag. This tag has attributes that specify what your site will look like. This deals with styling of your page (CSS). If you're using extensive CSS, include the file as an external reference.

4. The script tag. This tag lets the browser know that a block of JavaScript code is about to be initiated. While Google ignores the information in this tag, it's still useful if you want to take advantage of JavaScript. You would use JavaScript when you want to run applets, special programs that run in a separate browser window. Use of this tag may or may not be optional, depending on what your site is for.

5. Duplicate links. If you have duplicate links to the same page, Google only counts the first one.

6. Interlinking to points on the same page. Interlinking involves picking a point on your web page called an anchor that you want another anchor to link to. This practice is commonly used when websites present very long copy on the same page. Readers can click on links throughout the document to jump to other parts of the document. It's very effective for increasing readability, but it's another optional device. Worst case, you could break up the copy and make more subtopic links.

7. Graphics, animation and video. Google pays no attention to these types of content, but it may notice the descriptive attributes surrounding them and certainly their URLs.

8. Boolean words. They are words like a, an, the, is, etc. If you're optimizing for Google only, don't bother including these keywords.

How Not to Link to Sites That Are in a Bad Neighborhood

Basically, sites that are in a bad neighborhood are those that post on link farms, splogs, or other sites using black hat SEO techniques. Stay away from these types of sites. Do you know that if a person you're linking to posts on these types of sites, you could get in trouble with Google as well? It's unfair, but true. And don't think that because a site has a good page rank today that tomorrow it won't use black hat techniques that would mess up your site. This is why you need to keep your eye on the sites to which you link.

One way you can do this is to read the page rank bar on the Google toolbar. This is better than using linkvendor.com, because it tells you if a site has been banned, whereas linkvendor.com may not. If the page rank bar is gray, that indicates a ban. However, don't confuse being banned with having a page rank of 0. Just because a site has a 0 page rank, that doesn't mean it's linking to sites in a bad neighborhood. It could just mean that not enough time has passed for the webmaster to get the site to rank high enough in search engines to receive a higher page rank. Recently, for example, there was a proxy problem (now fixed) that erroneously returned sites with a page rank of 0 which in fact were ranked higher.

How to Get Your Site Listed in Google in 24 Hours or Less

Wouldn't it be nice to start seeing your site in Google's search engine results in 24 hours or less? It should be first noted that if a site is crawled but not yet indexed, the results aren't visible to search users. For example, if you enter the full domain of your site with the "http://www." and your site hasn't been listed yet, it won't show up in Google's results. When your site does get indexed, if you enter the full URL, you'll see your site listed. This listing contains the URL, the title of your website, and a description.

To get your site indexed quickly, you won't use Google's submission form (google.com/addurl.html). Using this method may take 2-6 weeks to get your site indexed.

So, what do you need to do to get your website indexed in 24 hours or less? The first step is to visit Google and enter a broad, generic keyword that's relevant to your site. This is the rare time that the broader the keyword, the better. Don't worry about trying to go for niche markets with this step, because you're going to want to have access to sites with the highest level of traffic. Once you enter the keyword, you see the Google listings. Use the "Page Rank" indicator on the Google toolbar to see what the page rank is (or you could use SEO Elite or LinkVendor, but doing it right from the browser is faster).

To refresh your memory, the higher your page rank, the more websites that are linking to you. Keep an eye out for sites that have a page rank of 5 or higher (with the higher ranking being the better one). Visit each of these sites to see if they offer a link exchange. Remember, if they do they'll advertise it in the same way you did yours, through a "Link to Us" web page or something similar. Look for the contact information if it's listed. If it's not listed, use the Whois utility found through domain name services or SEO Elite to find their e-mail address. Use the same methods of e-mail etiquette you learned about before and send them an e-mail asking if they're interested in a link exchange. Remember to post their links on your site first before you send out the e-mail.

Just make sure the site you choose has a page rank of over 5. If you advertise your site on a site with a page rank of 5, your site will get indexed in three days or less. If you advertise your site on a site with a page rank of 6, you can get your site indexed in less than 24 hours.

Sep 5, 2008

How to Share a Printer Over a Network

You don't need multiple printers just because you have more than one PC. Here's an easy guide to share your printer from one computer to another.


Choose Your Printer

Having several computers in your home or office doesn't mean you have to buy several printers, too. If your PCs are connected via a wireless network (or a wired one, for that matter), you can easily share them by turning on Sharing in Windows. To get started, open the Printers and Faxes control panel in Windows XP (simply called Printers in Vista). Right-click on the printer you want to share, and choose Sharing.


Configure the Sharing Properties

In the printer's Properties menu, the Sharing tab should now appear. Click the radio button next to "Share this printer" and give the printer a share name that you will easily recognize. Click OK when you're done. Afterward, the icon in the Printers and Faxes control panel should display a cupped hand on the printer's icon.


Add the Shared Printer to Other PCs

On each of the computers that you would like to use with the shared printer, you will need to add the shared printer. Make sure each of these machines is connected to your network before opening the Control Panel and selecting the Printers and Faxes (in XP) or Printers (in Vista) control panel. Once it's open, click "Add a printer" to proceed. On the next screen, choose "Add a network, wireless or Bluetooth printer."


Complete the Sharing Setup

Windows will automatically search your network for any shared printers and display its finds in the "Select a printer" window. You should see your newly shared device listed. (If you don't, then there may be a problem with you network settings.) Select it and then click Next. For the vast majority of printers, Windows will automatically download the appropriate driver for you at this point, if it's not already on your system. Your shared printer will now appear in your Printers and Faxes (or Printers) control panel, and should also appear as an option from within the Print menus of all your applications. From here on out, the hardest part of printing over your network should be walking over to the printer to grab your documents.

Aug 31, 2008

Tips on Reducing Your PC's Power and Operating Costs

As energy costs rise, PC power conservation can trim $100 or more from your total electric bill each year. That's enough for a nice dinner with your spouse--or if you're not the romantic type, it can get you a few months closer to purchasing a new, faster (and more energy-efficient) system.

Depending on their age and design, a desktop computer and monitor consume from under 150 watts to greater than 800 watts when in use, and from fewer than 50 watts to more than 400 watts while turned on but idle. For this article I used a watt meter to measure the power consumed at the outlet by a 3.4-GHz Pentium 4 system with 1GB of RAM, an 8X AGP video card, two internal hard drives, an optical drive, and a 19-inch LCD monitor. This is not a high-end machine by any means; I selected it because it demonstrates how a few simple tricks can help reduce the amount of electricity an average system uses by more than 50 percent. This relatively modest PC varied from a minimum of 195 watts while idling at the Windows desktop, with no applications running, to 305 watts with the processor and graphics under 100 percent load; its average power rate was 250 watts.

Such figures may not seem substantial when you consider that dual- and quad-core processors consume 130 watts or more each at full load (however, new CPUs manage power more efficiently when they're not running under full load, so they may consume less power than older, slower processors). Also, high-end graphics cards use nearly 200 watts each. Still, if you were to allow this system to operate continuously, it would easily run up more than $200 in energy costs over the course of a year. Fortunately, you can apply changes to several configuration settings to bring the power consumption and operating costs of any system down significantly.

Save as Your PC Sleeps

Modern PCs incorporate a power-management standard called the Advanced Configuration and Power Interface (ACPI), which allows the operating system, BIOS, and hardware to cooperate in reducing power consumption. ACPI defines several global power and sleeping states; our chart below lists the relevant ACPI states and corresponding Windows XP/Vista modes, along with the power used by each mode on the example system.

You've probably put your laptop into hibernation or sleep hundreds of times, but people typically ignore these features on desktops. As the chart shows, power use in the S3 state (Standby in XP, and Sleep in Vista) is nearly equal to that used when the PC is powered off. The S3 state drops PC power down to 10 watts or less when idle even if the system consumes considerably more power than average while active. Unfortunately, most PCs I encounter are not configured to use this mode. Some older boards and peripherals may not play nice with S3, sound cards being particularly troublesome.

To tweak power management settings in Windows XP and Vista, open the Power Options applet in Control Panel. The three preset schemes are:

* Turn off monitor and/or hard disks only
* Standby/Sleep mode
* Hibernate mode

While Hibernate mode uses the least amount of power, it takes the longest time to suspend and resume, which involves writing and reading the entire contents of RAM to and from the hard disk (using a file named hiberfil.sys). The more RAM you have, the longer the process takes. On the other hand, the Standby/Sleep mode (S3) uses only slightly more power than Hibernate does, yet its suspend and resume times are virtually instantaneous no matter how much RAM is installed.

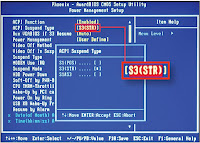
A BIOS setting called ACPI Suspend Type, ACPI Suspend State, or something similar controls which sleep state (S1 or S3) Windows uses. Many systems are set to S1 by default, which keeps the CPU and RAM powered. Enter your BIOS, navigate to the Power Management menu, and change the ACPI Suspend setting to S3, which cuts power to the CPU and RAM. The screen shot on the left shows this setting on a Phoenix/Award BIOS. Enable any settings labeled 'USB KB Wake-Up From S3' (the wording varies), and set the Power On Function to Any Key to let the keyboard and mouse wake the PC from standby.

Change Settings to Conserve PC Energy

Depending on the Advanced Configuration and Power Interface (ACPI) settings in your PC's BIOS, the machine may be running up your energy bill even when you're not using it. Click the icon below to see our chart describing different levels of power consumption.

Windows Power Tweaks

I set Windows to enter standby after 30 minutes or an hour, which strikes a balance for me between too often and not often enough. I also recommend that you open the Power Options Control Panel applet to configure the power button on your system to invoke standby or sleep mode rather than to turn the PC off. In XP, choose the Advanced tab, and under 'When I press the power button on my computer', select Stand by. In Vista, click Change when the computer sleeps or Change plan settings. In the Edit Plan Settings dialog box, choose the idle time before turning your monitor off and putting the computer to sleep. Next, select Change advanced power settings, click the plus sign next to 'Power button and lid', choose the plus sign next to 'Power button action', click the current option to make the drop-down menu appear, and select Sleep on that menu.

You can also invoke Windows' sleep mode manually: In Windows XP, click Start, Turn Off Computer, Stand By. In Vista, click the Start button, choose the right arrow in the bottom-right corner of the Start menu, and select Sleep. (Note that Vista may have standby selected by default.) To resume, press the power button or any key on the keyboard, or simply move your mouse.

Save a Little, Save a Lot

How much money can these changes save you? That depends on what you pay per watt for electricity, multiplied by the number of watts consumed when the system is inactive. According to the United States Energy Information Administration's June 2007 Electric Power Monthly report (go to the link for the most recent report), the average price of electricity to residential customers for the year ending in March 2007 was 10.47 cents per kilowatt-hour. If your PC is powered on continuously but runs actively only 10 hours a day, five days a week, and it uses a 3D screen saver during periods of inactivity, it will be in use 2600 hours each year, and will consume 250 watts on average. This drops to 225 watts during the 6160 hours of the year it is powered on but inactive. Running this system for a year would cost $213.17, but an energy diet brings its annual power costs down to just $73.86, representing a savings of nearly $140 (see the chart below).

Of course, your mileage will vary, but the savings are significantly greater for power-hungry high-end systems. Simply switching from S1 Suspend to S3 offers virtually the same savings as you would realize from manually turning the machine off when it's not in use.

How Much Will You Save?

Reduce your electric bill--and your PC's environmental impact--by setting Windows to standby or hibernate. Click the icon below to see our chart showing the approximate amount of money saved by different PC states.

Tweak Windows' Power Settings to Cut Your PC's Energy Use

If your system is using the default power settings in Windows, it may be adding unnecessarily to your electric bill. Find the right balance between cost and convenience when deciding how quickly your machine's components should enter their sleep mode. To access the Power Options in XP, click Start, Control Panel, Power Options (Start, Settings, Control Panel, Power Options if you use XP's Classic menu). In Vista, click the Start button, type power options, and press Enter.

Under XP's Power Schemes tab, click the drop-down menus to have your monitor and hard drive enter standby more quickly.

Restart XP faster via this option to put your PC to sleep rather than shutting it off when you press the power button.

Customize Vista's preset power options to reduce the amount of energy your PC consumes when it's not in use, without causing inconvenience.

Save time by setting Vista to sleep rather than to shut off entirely when you press the power button.

Aug 29, 2008

Why Does My PC Suddenly Shut Itself Off?

If Windows inexplicitly closes and your PC shuts down, it's almost certainly overheated. The PC, which monitors the temperature of the CPU, is protecting it's delicate circuits from the ravages of heat. (On the other hand, if you PC frequently shuts off without closing Windows first, causing an error message when you next boot, it's likley time to replace the power supply.)

You can monitor your PC's temperature with SpeedFan, a free program by Alfredo Milani Comparetti. Although intended for adjusting fans to fine-tune the heat, noise, and power balance, SpeedFan also displays the CPU temperature in the system tray.

Of course, knowing the CPU's current temperature isn't much use if you don't know the chip's safe parameters. If you don't know your processor, click Start, right-click My Computer (Computer in Vista), and select Properties. With that information, go to CPU World to find your processor's temperature information.

What can you do to relieve overheating problems? If you have a desktop PC:

  • Make sure nothing is blocking the PC's air vents.
  • Unplug the PC and open it up. Use a can of compressed air to remove dust, especially around the fans and vents.
  • While the PC is open, note the position of the internal cables. Are any of them blocking vents or air flow?
  • Plug in the PC--while it's still open--and boot it to make sure that all the fans run properly. If one isn't spinning, try to find out and fix what's blocking it.

If you have a laptop:

  • Make sure that nothing's blocking the vents in any location where you commonly use the PC. Be especially careful about running it on top of pillows or blankets, which can easily block the vents.
  • With the PC off, spray compressed air into the vents to remove dust. Use only a moisture-free compressed air canister.
  • If these steps don't help, take it to a professional. Unless you really know what you're doing, you don't want to mess with your laptop's innards.

Could software be the culprit? Unlikely, but if your PC isn't overheating, a bad driver may be at fault. Try updating your video and sound drivers just to be safe. And it's possible that a malicious program is behind the damage. Better download an anti-spyware software to handle that.

Aug 27, 2008

What is Pinoy PC Tips?

Pinoy PC Tips is a blog which compiles PC tips and tricks which I find to be useful. This blog may be a bit biased regarding Microsoft operating systems and software but this is because of practicality and wide reach of readers. When I have information or if there is a demand for a topic regarding other PC operating systems, I will gladly share them on this blog.

This blog is also my own way of paying forward. I hope my posts will be useful to people that need technical assistance and additional technical knowledge. I know that this idea might not be original, but I strive to deliver what is most practical and the most efficient way of dealing with technical difficulties in the use of the PC.